 Pictures, and text are the key, however.
-
Very well said, Mike. Like you said, when a person humbly says they feel overwhelmed by a project, you know they are going to do everything they can to find the information they need, and do the job correctly. Of course it's also beneficial to see how an expert does something as well Pictures, and text are the key, however.
Last edited by exeric; 08-31-2018, 03:09 PM. -
You're spot on Eric, member builds is my my favorite to see how others approach problems as well as to to have a sneak peak at their work area. I follow garage builds Garage Journal, wood machinist chest restorations, even off the the grid homestead builds, anything with a serial build is of interest. I know on this thread the it started out with "This probably won't be very good, but here it goes." That couldn't be further from the truth. Plan it, build it, document it. It is of huge value when preserving the heritage of old stuff. ThanksOriginally posted by exeric View Post
Mike LoveLeave a comment:
-
It's very difficult to stay on top of a build thread. Taking pictures at critical junctures often interferes with the enthusiasm of the project. . . But, it's worth it, and I think most everyone will agree that a build thread is their most favorite feature on this forum.Leave a comment:
-
I second that, keep up the good work Harry, that 101 is going to be great!
DamonLeave a comment:
-
Thanks Doug, and now I feel like I shouldn't have started this thread because it's very difficult to keep one of these threads current! When I have the spare time I will work on the 101...OR I'll ride my Chief and completely neglect updating the build report on the internet! BTW, I continue to use your build story and pictures as reference, extremely helpful, thank-you! So I will put some time into updates....after Labor Day! I've made progress!Originally posted by djones View PostLeave a comment:
-
Good job splitting the tank. I did the tank on my 101, and it is a job, but worth the effort. Getting it clean is the key, and a lot harder than it seems. I also made the mounting bungs much bigger diameter than the originals, which gave more bearing surface inside the tank.
Keep up the good work. 101's are special!Leave a comment:
-
Well, not much to to report as it’s now the summer ride season and I concentrated on getting my Chief ready, and then riding it! But I have run into a question about the holes in the casting for the kicker return stop. The forward hole had a broken off bolt in it.
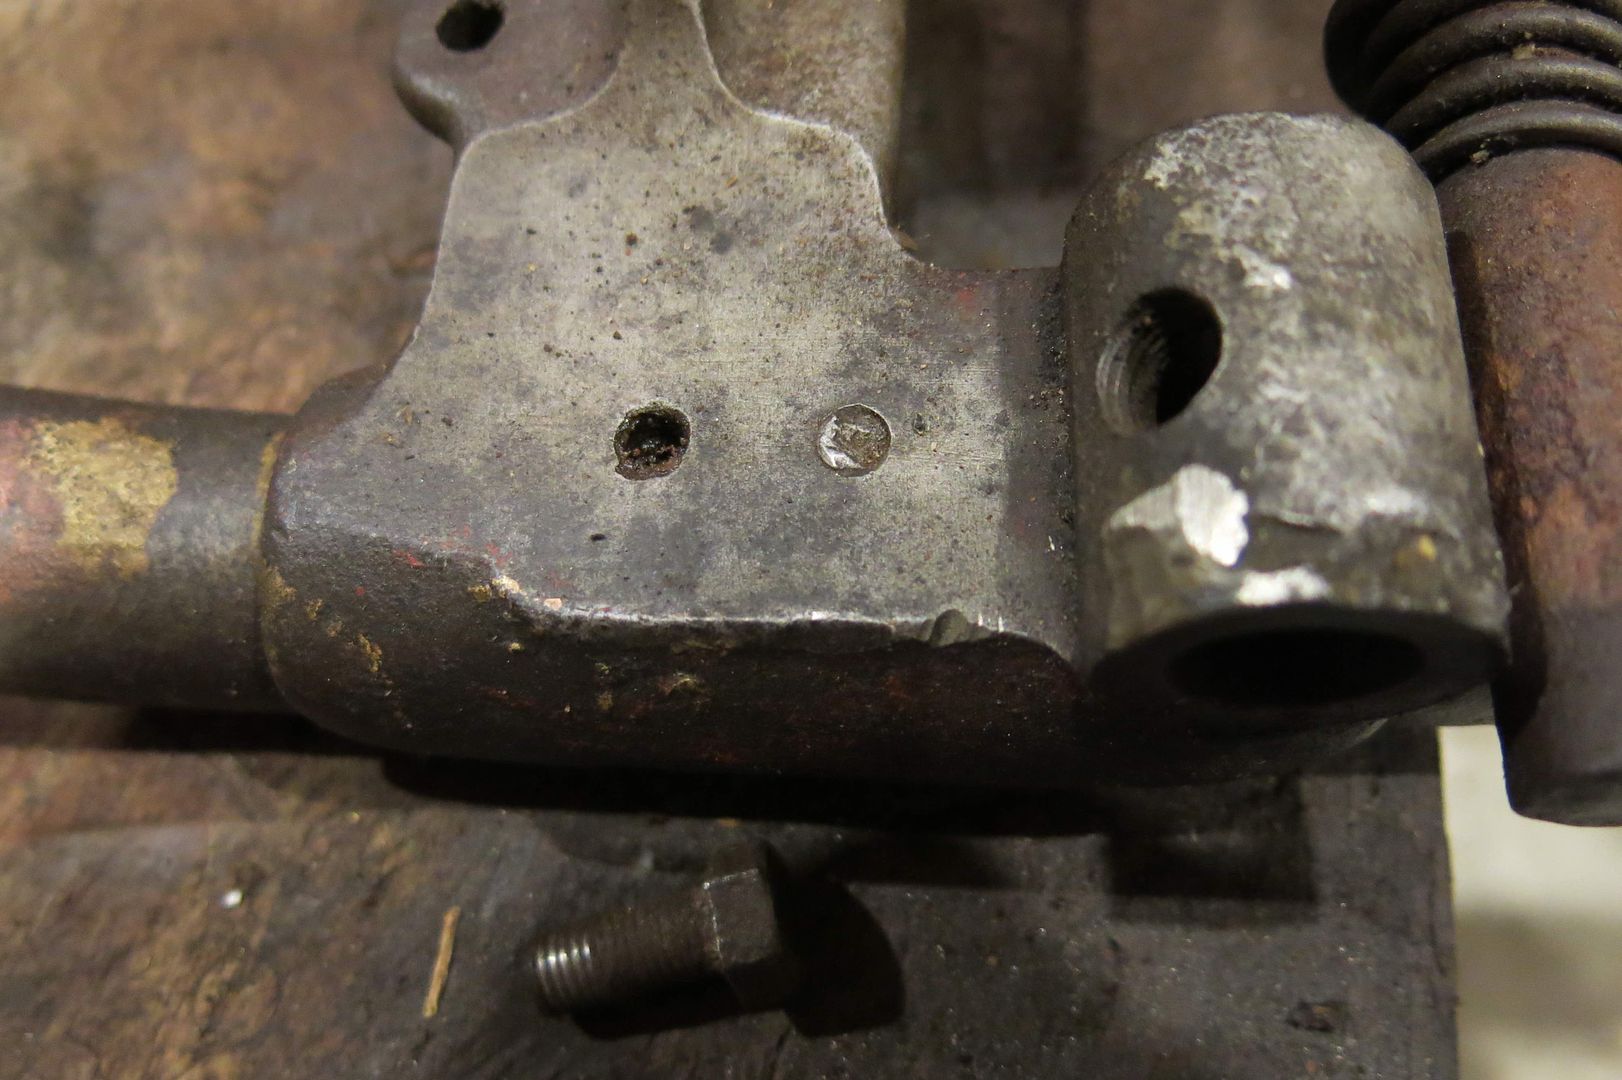
I tried a couple of methods for removal but then resorted to drilling and re-tapping. When I drilled the front hole I could go deep into the casting, but with the rear hole it appears that there is either another broken bolt in there, or that rear hole requires a short bolt as the frame tube is brazed far enough into the casting to keep the hole shallow.
So I wonder if anyone can tell me if the rear hole for the kicker stop is normally shallow like this? Thanks!
Leave a comment:
-
Not much to report (things got very busy with work... the paying kind) but I did acquire a new wrench. I like tools, I've got three sets of them (warehouse, home, shed) but I didn't have a suitable wrench for removing the head adjusting cone in order to remove the forks. I used a strap wrench until the strap started to shred, so then I bought this beauty, an adjustable hook spanner :
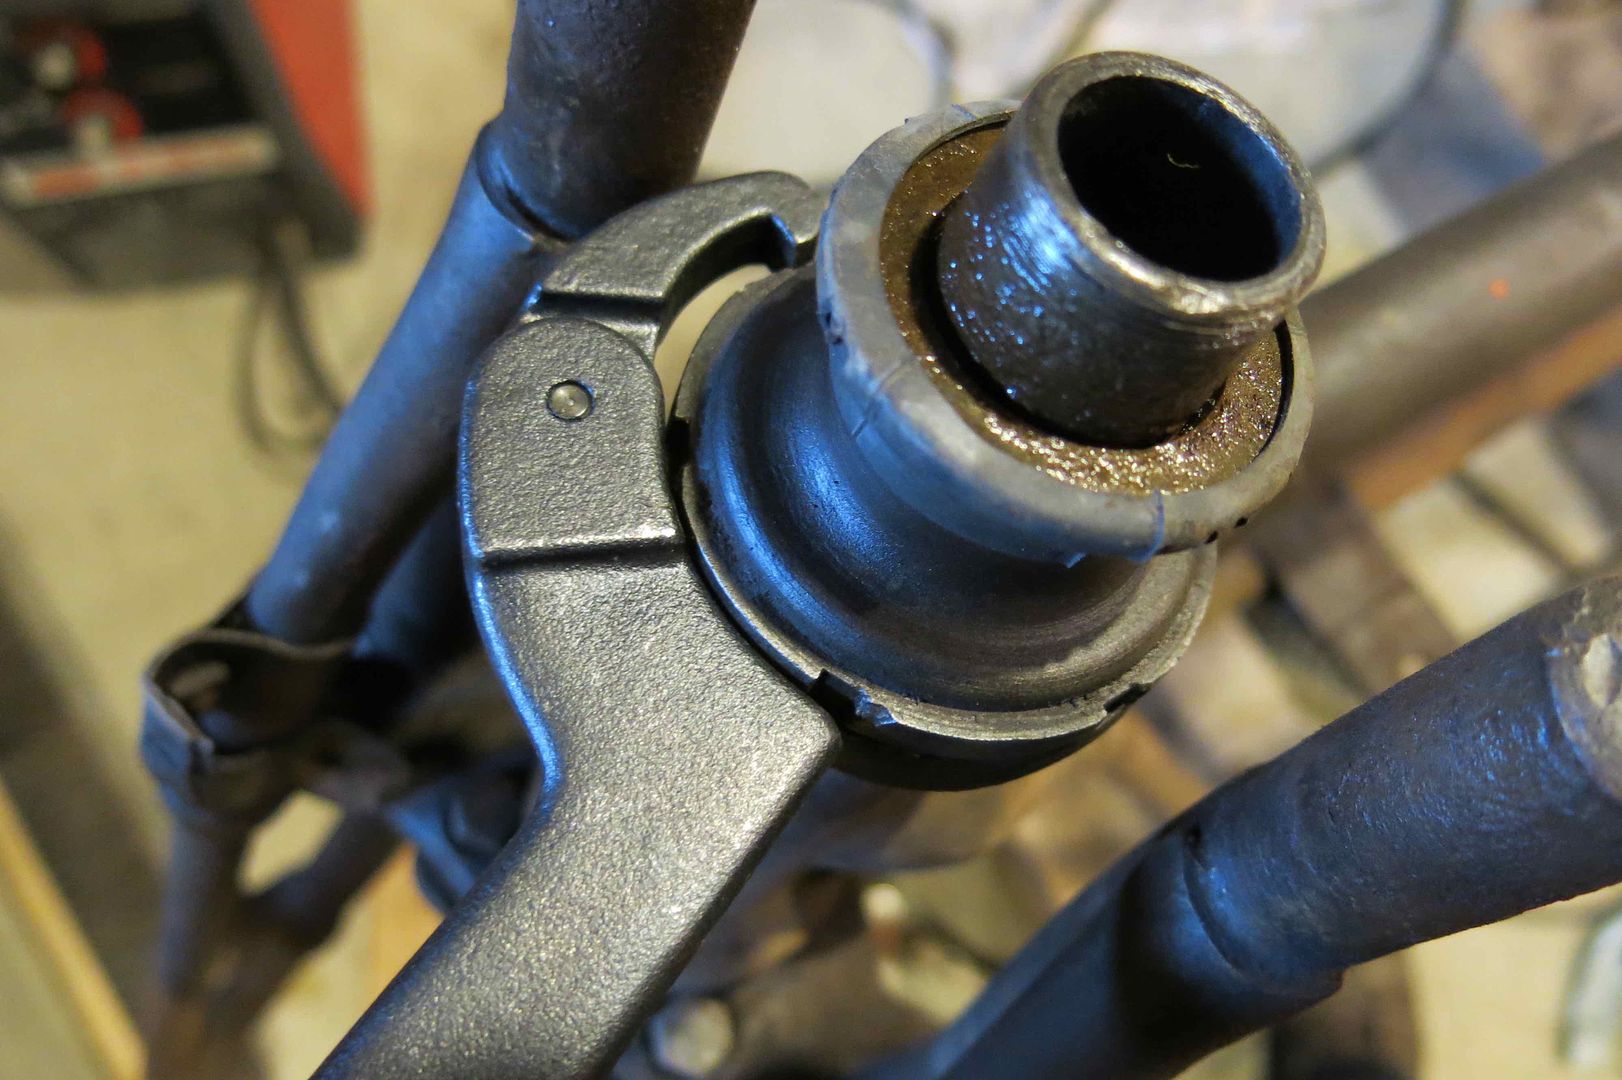
Worked great and now I have another tool! Got it from ZORO.com. Their item# GO494155, $27.84 (it's marked PROTO, mfg #JC472) Should work on my bicycle, too!Leave a comment:
-
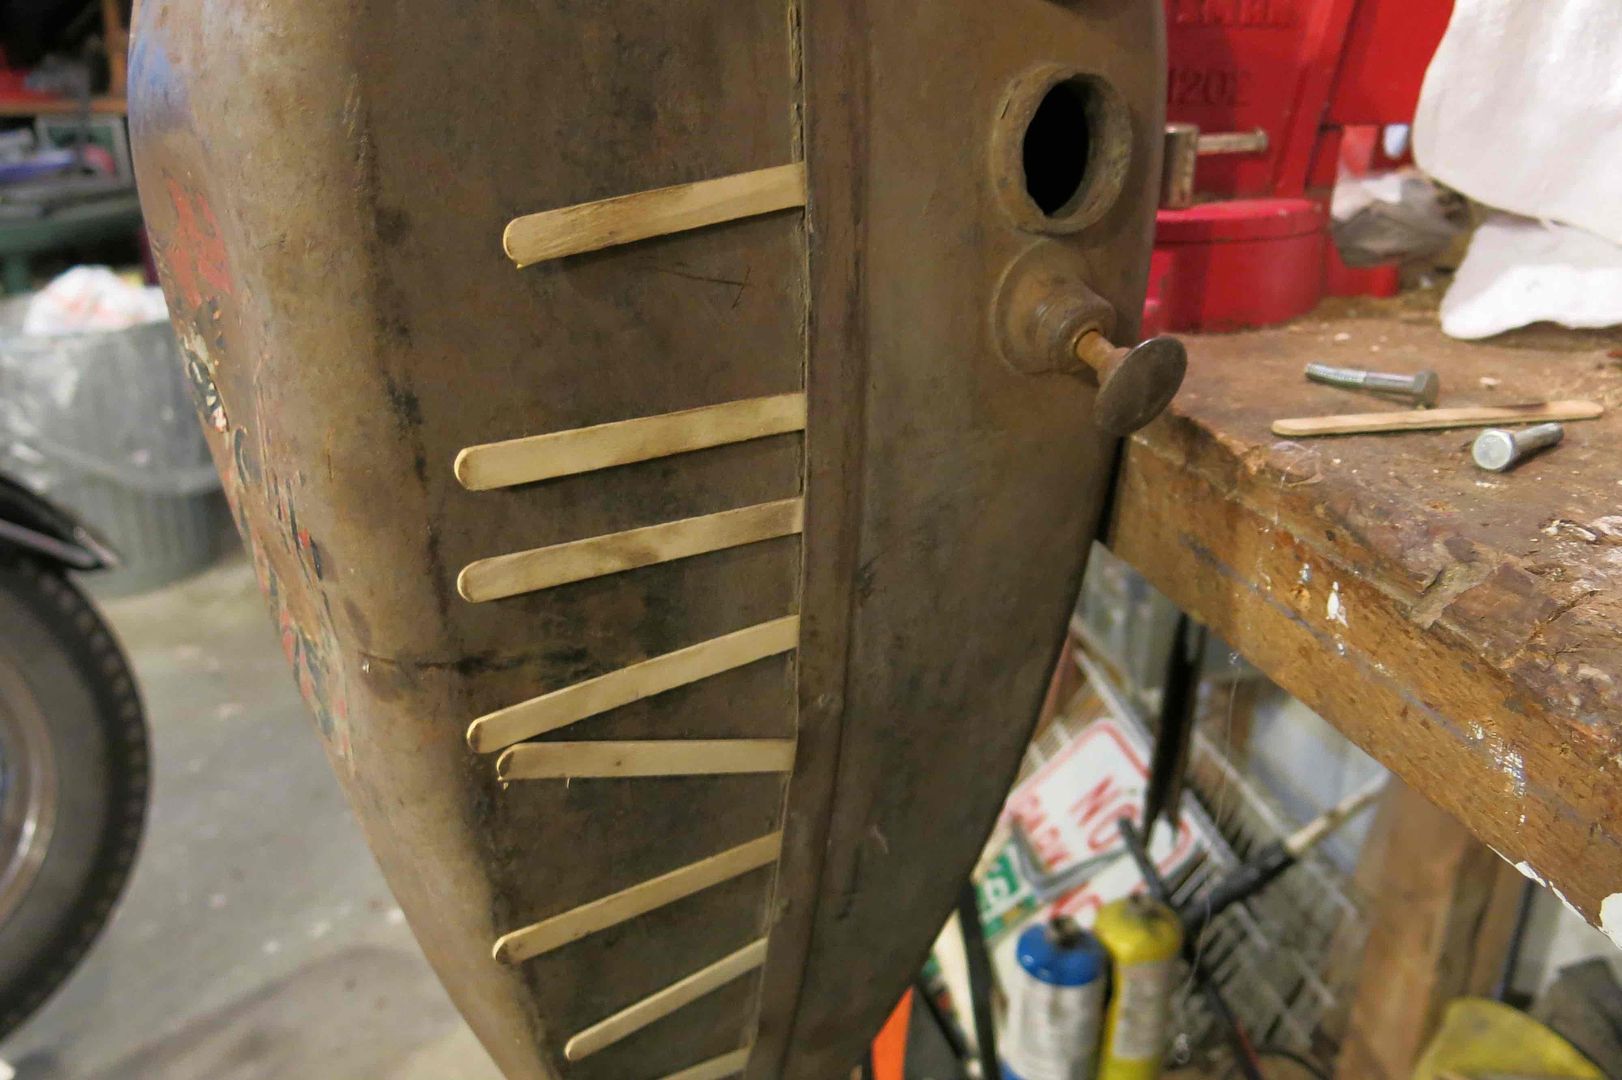
Nothing special here, but this is how I split the tanks. Using a soldering iron I worked my way around the tank on the seam and inserted popsicle sticks to keep the halves apart (the job would've been much more pleasant had each stick originally held a treat). The corners were tight and I changed to utility knife blades.
Leave a comment:
-
Thanks fellas! I complained about myself on another forum about jumping around the project from one thing to another without focusing on finishing a specific thing before starting another. But at this stage I think that's working for me...I'll eventually zero in on an area and focus on it (e.g. frame...or motor...or sheet metal), but for now I'm still in the "exploratory" phase!Leave a comment:
-
You'll have years of fun with it, Harry Just like going up hill; you'll be half way to the top, look back, and be amazed at how far you have come. If I get a title for my free Honda, I'll be right there with you in new territory.
Leave a comment:
Leave a comment: