-
I think at this point you should stop and sell it to me for a nice profit before you *uck something up or get buried in this bike with problems or $$$$$. -
Dirt: Worse than I thought.
OK, time for a little update. First, one of the problems I ran into is one I have faced before, but never in such quantity. That problem is dirt.
Look, I'm not afraid to get my hands dirty. I've cleaned more goop than I'd care to think about, but this bike's previous owner took a special pride years ago in never, ever washing the bike. This has been problematic for two reasons: First, it was indeed a mess. Plastic scrapers, scrub brushes, the car wash, gallons of kerosene... I've used all that stuff trying to get parts clean enough to inspect/work on, but not ruin finishes. This pasty combo of 60 wt. and dirt is insidious, and removing it is worse than on any other bike I've owned or bought. The second problem I'll discuss after a quick picture.

The second problem with dirt is that it makes it hard to assess something's condition. My frame, which I thought to be in pretty good shape, is a shitshow. It took a Simple Green bath one night, and then we finished at the car wash. In addition to the cracked seat post tube, I saw shiny spots about 3/4 of the way up on the seat post tube, which lead me to believe a head was rubbing on it. The bottom frame rails are in pretty bad shape, and there were about a dozen poor welding repairs done to the lower half of the frame.
Fixing these items requires a jig, probably a fixture, and a hell of a lot of metalworking talent. I'm not terrible with metal, but frame repair is way out of my skill level. I've made some sissy bars and welded plenty of tabs and whatnot onto frames, but this is way past my ability level. The frame appears to have taken a hard hit (hits?) from below. The tubes are ovaled quite a bit and even the crash tube up at the neck curved upwards slightly - yikes.
So my frame went to Mike P. at 47 Industries. He does remarkable work, and is going to save all my castings, and he'll have the thing for a few months. The downside to Mike's work is the cost, but I suppose A) this is the base of the bike, B) it's not like Knuck frames are not worth saving, C) I knew this would not be a cheap bike to play with, and D) if you have to farm out work, you pay the piper.
In the meanwhile, I scrubbed off the wheels. I actually have two different finishes! The front was painted at some point, and the rear appears to be a chrome unit.

I have disassembled the front hub for rebuilding. Everything, fortunately, was in great shape back there. I need to put it back together. I have some no-name corks from J&P Cycles that I had trouble with the last time I built a starhub, so I am waiting on some James brand units to see if they will work a bit better. (The J&P corks seem to be oversized; they're very hard to fit into place. They make obtaining a lateral play reading nearly impossible; the cork compressing almost factors into the measurements. How the hell do you measure shims if you have no idea what the cork will squish down to?!) If the James ones are satisfactory, I'll bust down the other hub and rejuvenate that one, too. (I mean, I guess I'll do it either way, I just want to try to use corks that don't totally suck.)
In addition, I'm going to buy some new tires and tubes. Avon Safety Mileage tires are looking good right now; unless someone can tell me why I should spend more for a Firestone Champion Deluxe or other tire, those are probably going to be my new skins.
I want to get the brakes up to snuff while I'm in there. The front looks pretty good; that stuff will likely all be reused (It even functioned well before I disassembled.) The rear is a different story. The shoes are wasted and so is the sprocket; the brake arm lever has nearly worn through the actuating rod, so all that stuff needs replaced, I believe. I'm not going to toss any of it, but I'm probably not going to run it or rebuild it; the cost makes that a little prohibitive. I imagine I will pop for some repop stuff from V-twin unless anyone else can tell me a better aftermarket source.
My hope is to get the wheels ready so I can bolt them up to the chassis, get it on the table, and start installing sheetmetal.
Before I leave, I have a question. My taillight housing appears to be original; the lens is aftermarket. The housing is tired: the screws for the lens have been changed to metric at some point, and the little cast piece above the light that the license plate bracket bolts too is damn near gone; the bolts are holding onto a thread and I am a little afraid to run it. (The "gasket" was basically a big dirt bag; that's going to get replaced with a rubber one.)
Has anyone ever successfully repaired these housings? It looks like junk pot-metal, but if it can be saved, I'd like to save it.Last edited by govmule84; 11-26-2016, 11:12 PM.Leave a comment:
-
Good to know. Consider it gone!
Thank you for checking in on me, Robbie. I appreciate having an experienced eye making sure I'm doing this the way I'm supposed to.Leave a comment:
-
That scabbed on bit isn't factory, for any application. Clean it off.Leave a comment:
-
Here we go again. I been letting my witch's brew set (acetone, transmission fluid, and kerosene) in the springer, trying to free up that damper rod. Each night I come give it some whacks with the rubber mallet. Tonight, I thought to warm it up a little. A buddy told me it was no big deal, the solution would just boil if I got it hot. So I gave it a whirl. It boiled, and I figured it probably got a chance to creep in. I felt the springer with my bare hand, though, and thought she could take a little more heat.
So out comes the torch again. My buddy was half-right. Sort of. It just boiled... until it boiled over. Then it ran over and into the flame. Fortunately, I had an old bath towel laying around to kneel on so my knees don't get beat. Everything got put out alright, but I doubt I try that trick again. I know better!

The frame is all stripped down now for repair.

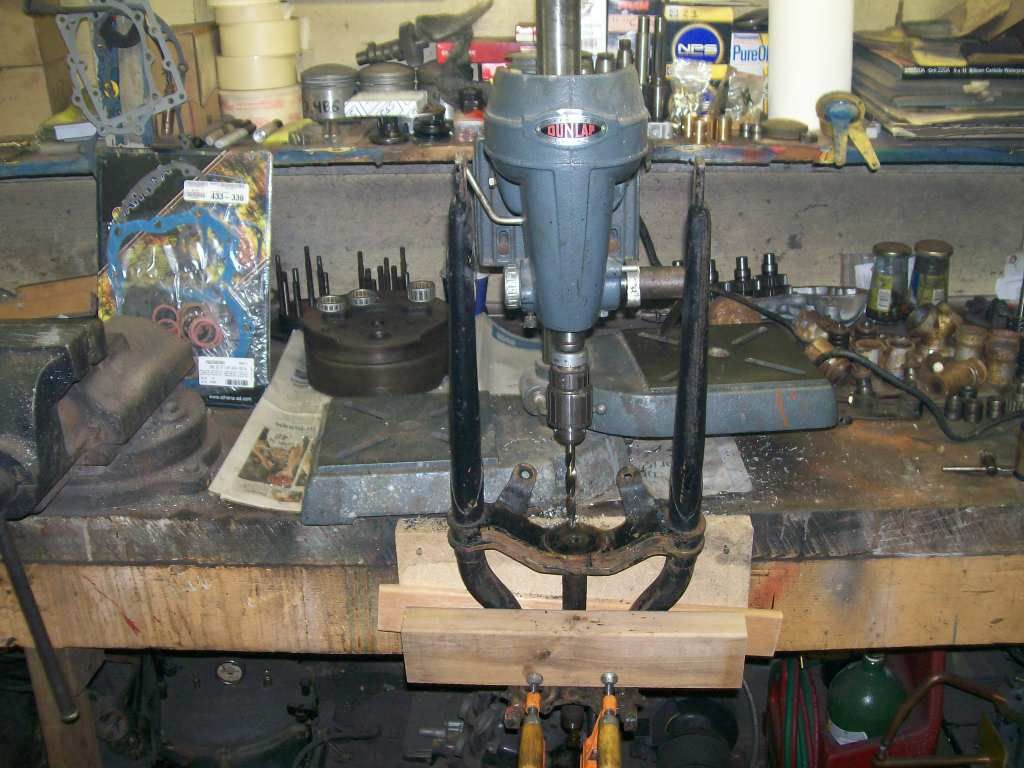
And the seatpost tube is pretty fouled up; the pogo itself was holding everything in place. Worse still, I wrecked the pogo rod pulling it apart. The threads were all boogered up from running over something and I couldn't get the rod to keep from spinning, even with an impact gun. Excuse my shitty focus... I used a little pocket-rocket camera I have, I didn't drag out my whole picture rig.

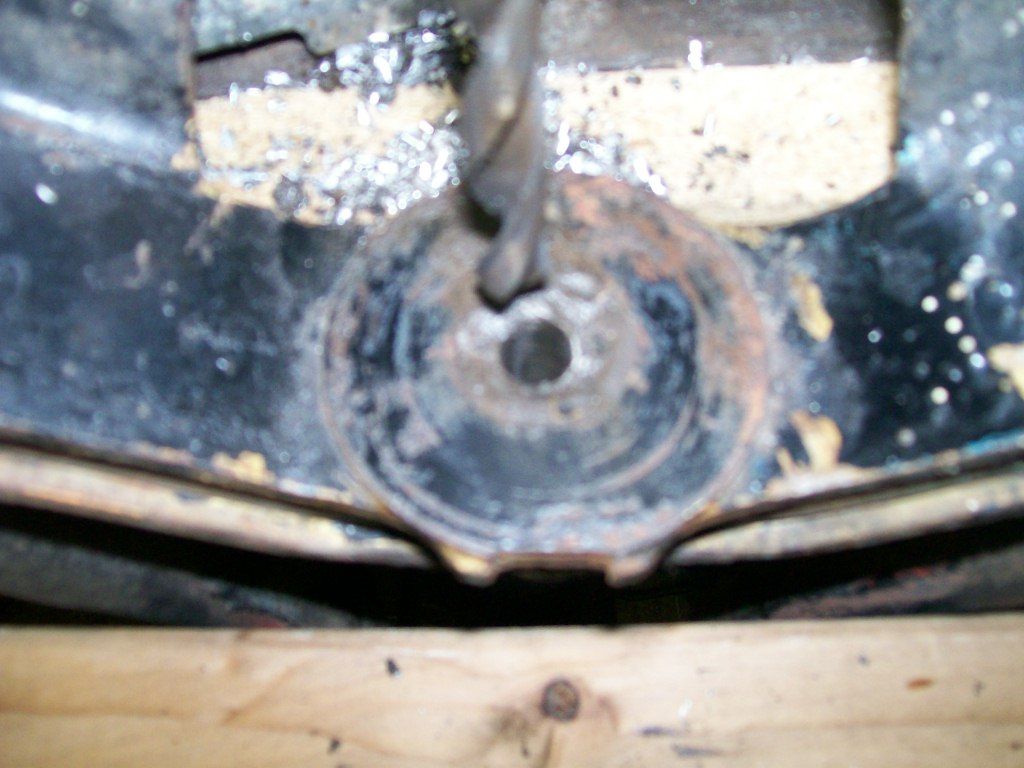
Finally, and most importantly, can anyone tell me what the hell this is? Is this scabbed onto my frame for an exhaust or something, or is this a legitimate factory addition? The oldtimer seemed to think it was for a fire extinguisher, but I can't seem to confirm that. Any help appreciated!
 Last edited by govmule84; 11-11-2016, 03:36 AM.
Leave a comment:
-
Welcome mule and a nice project you have. Vintage iron is the way to go.. No matter what make.Leave a comment:
-
BigLakeBob, I'm not a fan of that company's stuff either, but often it's all I can get. It beats nothing. That said, my cups look peachy; they'll be put back into service.
1950 Panhead, thanks for the advice. Hopefully I can save mine. I do have time on my side. I pitched some acetone into the brew today, hopefully that helps it creep.Leave a comment:
-
It is easier to scrape crud with a putty knife then use kerosine on a rag.I'm going to find a refrigerator box this week so I can line it and start scrubbing larger items in kerosene. (If I find a kiddie-pool, that would be best, but beggars cannot be choosers. Methinks all the seasonal summer items at Wal*Mart have been put away.)
The rod rusts to the fork in the lower part of the neck.Now for the "please help me" portion. My damper rod is stuck in place. I tapped at it, and it didn't seem to budge. I don't like to be a roughneck if I don't have to, so I mixed up ATF and kero, and filled 'er up. Does anyone have any advice for me moving forward?
1. penetrating oil
2. heat rod on bottom.
3. pound on both ends with hammer.
If you can get it to move back and forth it will free up, usually cannot be saved, don't worry about it.
4. I have freed some with steps 1-3. I've had to drill some out from bottom that I could not loosen.
Leave a comment:
-
The ball size should be 5/16 (.3125). Hopefully you can reuse your original neck cups. A friend of mine just did a bike build where alot of the major components came from a major aftermarket company based in NY. The neck cups are not machined correctly resulting in the fork stem not sticking out as far as it should on the top side, about 3/16" short. Also, I tested the cups in the race area on a hardness tester. Not even close to original. The original are about 65Rc and these were in the 40's Rc. They will not last, I cut them on the lathe where originals are so hard they would need to be ground. This is just not one set, I had 5 sets here (some from another friend) and they were all the same. Just a heads up, OEM is much better.Leave a comment:
-
OK, research leads me to believe there are 17 top and bottom, so I am missing one of each. Neck cup kits are kind of pricy, so can anyone tell me what size these balls are before I go bring one down to the bearing supply house?Originally posted by govmule84 View PostLeave a comment:
-
You guys are getting all the pictures as I take 'em.Originally posted by Jerry Wieland View Post
I'm going to let that damper set and marinate in the brew for a while. Ideally, I am imagining I tap the top a bit and it falls right out, yes? Is there a penalty for beating from the top as opposed to drilling from the bottom?
I counted 32 balls that fell out when I pulled the springer. Is that the right number? Sixteen top and bottom?Last edited by govmule84; 11-06-2016, 09:09 PM.Leave a comment:
NOTICE: New member email requirements now in effect. Longtime member having trouble logging in? Please review the requirements here.
Only registered users may post new messages on this forum. You must be an AMCA member to register. Click the register link on the top right to proceed.
If this is your first visit, be sure to check out the FAQ by clicking the link above. To start viewing messages, select the forum that you want to visit from the selection below.
If you are NOT an AMCA Member and would like to join Click Here

Leave a comment: