Announcement

Collapse
No announcement yet.

1940 Chief 340 Generator Cover (fuse block)

Collapse
X
 
  • Filter
  • Time
  • Show
Clear All
new posts

  • 1940 Chief 340 Generator Cover (fuse block)

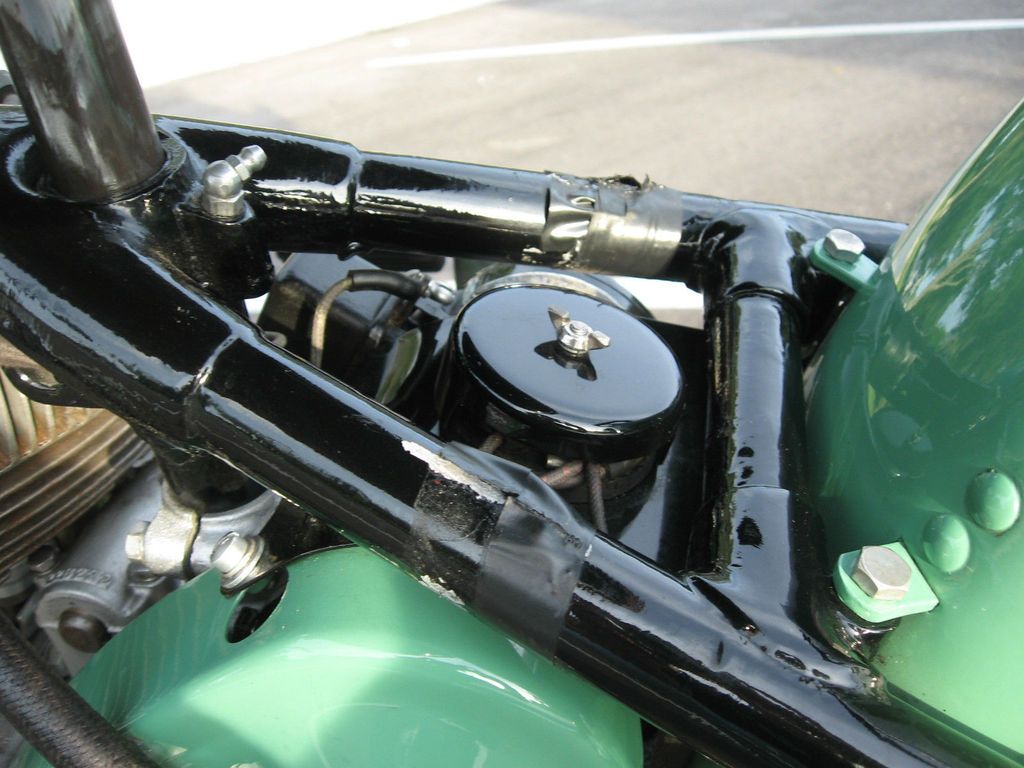
    I have the 3 hole plate that has a gentle curve to it and is used to mount the round fuse block assembly with a single (special) pass-thru bolt and wing nut on top. I am not having any luck finding a good picture of where it connects too and what bolts are used. I think the back two holes connect to the underside of the frame just above the generator and I assume the other 3rd hole connects to the generator or something?

    Does anyone have more information, perhaps a good picture or two of this location as well? Also would the plate be painted the same color as the bike tin or the frame?
    Bob Beatty
    AMCA 19209

  • #2

    Comment


    • #3
      Have a look at this thread.... http://www.caimag.com/forum/showthre...wiring-diagram

      It has a wiring diagram showing the layout of the fuse box and its connection.

      Comment


      • #4
        Gentlemen, thank you both, this is very good information!
        Bob Beatty
        AMCA 19209

        Comment


        • #5
          on the back it mounts to the two castings. These are threaded on the bottom and the plate is bolted to them with two small sloted roundheaded screws (10-32 I believe, but can not confirm this now) - the plate and fuse box cover should be painted black.....

          Comment


          • #6
            Originally posted by gsottl View Post
            on the back it mounts to the two castings. These are threaded on the bottom and the plate is bolted to them with two small sloted roundheaded screws (10-32 I believe, but can not confirm this now) - the plate and fuse box cover should be painted black.....
            Thank you for this. I found I have a problem, on my bike the two holes in the casting are not small, someone at one time must have drilled them bigger. I have the proper slotted round-head screws and would like to use them, the problem I am faced with is how to shrink the hole without welding and drilling, I could just tap the casting and go with an oversize bolt but there must be a better solution? I have used in the past an insert that can be drilled to size and screwed in, I am ok with that BUT wonder if there are other options that someone could suggest?
            Bob Beatty
            AMCA 19209

            Comment


            • #7
              Hi,
              If your bike is assembled, there isn't much room to work in the area. Some might cringe at the thought of it, but a 'cold' repair - such as J-B Weld epoxy can give a decent repair until the time comes when something more permanent can be performed. There is not a huge amount of stress on that piece of fuse holder sheetmetal. If you install a slug of J-B Weld into each hole, you could also place the correct screw right into the middle of the slug before it hardens. A light coating of grease/oil on the screw threads will help prevent the screw from becoming stuck in the epoxy. After the epoxy has hardened, remove the screws, install the piece of sheetmetal, using the same type screw used when the epoxy was placed. As long as you don't use excessive force when installing the piece of sheetmetal, the epoxy can work remarkably well. Some blue threadlocker will help prevent the screws from falling out.
              That piece of sheetmetal was used up through part of 1946. I don't know when in 1946 the sheetmetal piece was dropped. When the sheetmetal piece was dropped, the generator belt guard had a larger underside reinforcement installed (factory spot-welded), and the generator oiler access hole was eliminated. As far as I know; for 1946, if the two holes in the rear are tapped, the bike came with the sheetmetal piece. If the two holes are not tapped, the bike did not come originally with the sheetmetal piece. All the various changes might not have happened at the same time. So many of these parts have been changed over the years, that determining exactly what happened when, is just about impossible.

              Comment


              • #8
                Howdy Steve,

                My 346 at link below a high 64XX with drilled belt guard with 1/4 24 nut affixed on back to anchor forward end of generator cover and frame tapped for same (incorrect items: headlight, front brake arm, crash guard/horn mounting etc.. rectified since this site created years ago).

                http://www.patwilliamsracing.com/1946indianchief/

                Clarification on above: frame is indeed tapped but not for 1/4 24's rather smaller thread per spec below.
                Last edited by PRG; 12-15-2016, 05:30 PM.
                Cheerio,
                Peter
                #6510
                1950 Vincent - A Red Rapide Experience

                Comment


                • #9
                  I checked on my 1940 frame - 10-32 should be correct for the 1940. The other frame I had earlier also had the small screws.

                  If the size of the holes in your frame are 0.2031" (13/64) or smaller you can use a helicoil insert 10-32.
                  Attached Files
                  Last edited by gsottl; 12-15-2016, 04:33 PM.

                  Comment


                  • #10
                    two excellent ideas, I was also thinking of the JB weld trick. I had forgot completely about a heli0coil method, there is not a lot of hold required. I will run out and check my heli-coil sizes which I had completely forgotten about. I think either of these should help get me on the path to fitting a correct size screw.
                    Bob Beatty
                    AMCA 19209

                    Comment

                    Working...
                    X