Announcement

Collapse
No announcement yet.

Earlobe restoration

Collapse
X
 
  • Filter
  • Time
  • Show
Clear All
new posts

  • #16
    Second rocker box repair


    Did it work???
    Yesss! Harry you da gun.
    Thanks for the help. Never would have worked it out without your pictures.

    This is the second rocker box. It had the middle mounting lug broken off. The lug wasnt supplied so I hacksawed off a piece and V'd it out so I could get in and get a full penetration weld.

    Steve Little
    Upper Yarra Valley. Victoria.
    Australia.
    AMCA member 1950

    Comment


    • #17
      Don't mean to butt in. I'm following along with you and trying to learn this, too. Can you just pluck a picture out of a computer file and add it? I'm not real computer literate but all my pictures are on my computer. Oh yeah, nice work Steve! DaleIMG_0818.jpg

      Comment


      • #18
        I see that picture comes out small, also. Dale

        Comment


        • #19
          Hi Dale. I dont really feel that I am qualified to give good advice on this but I started a free Photobucket account a few years ago for this reason. I think I read on the forum that pictures from Photobucket are displayed in a good size and are available to everyone who is viewing the forum in a unsigned in status.
          Every picture I have logged on the site (until today) has been Thumbnail and not viewable unless logged in.
          Steve Little
          Upper Yarra Valley. Victoria.
          Australia.
          AMCA member 1950

          Comment


          • #20
            Originally posted by painterdale View Post
            I see that picture comes out small, also. Dale
            Right! Nice work Steve (on the rocker box I mean).

            Dale, if you use a photo hosting site such as Photobucket (it's free for some reason) then you can follow the above instructions. But if your photos exist only on your computer then you've got to use the AMCA file upload option...and you get the thumbnails that one has to be logged in to view. So....if you enroll in Photobucket then you can upload photos one at a time to Photobucket from your computer ( your computer will still have the photo file, too, after you upload it) then you can get fancy and follow the above so that your photos appear full size in your post without anybody having to log in!
            Pisten Bully is Harry Roberts in Vermont.

            Comment


            • #21
              ...and those pictures of the computer screen I put up were simply screen shots of the actual screen I was looking at, on a Mac it's a little program called "grab", you open Grab and select what you want to capture and voila! it saves it and then you put it up into Photobucket if you wish to show it in a post.
              Pisten Bully is Harry Roberts in Vermont.

              Comment


              • #22
                Gotcha! Thanks Guys! Dale

                Comment


                • #23
                  I used a piece of 1/16” sheet metal and placed it under the rocker box to lift it up, before tacking the piece of alloy to the rocker box.
                  This gave a small step between the two surfaces of the repair block and the rocker box.
                  The step will allow me to mill the block back to the original surface of the rocker box, and (hopefully) not have any welding undercut marks in the finish cut.

                  I prepared the sides of the block with a big V and tacked it on both sides.
                  Then prepared the other two sides with the grinder to ensure a full penetration weld.
                  Put it in the oven and pre heated it to 300F- 150C and welded it.

                  When the rocker box had cooled I had to work out how to hold it flat and securely to machine it.


                  I decided to recreate the washer/nut recess in the lug. Placed a bit of steel under the rocker box because of the uneven step and clamped it to the table.

                  Steve Little
                  Upper Yarra Valley. Victoria.
                  Australia.
                  AMCA member 1950

                  Comment


                  • #24

                    The dark patch in the corner of the washer recess is the original surface. I think this cut is a close enough.

                    Now to clean the sides.
                    Steve Little
                    Upper Yarra Valley. Victoria.
                    Australia.
                    AMCA member 1950

                    Comment


                    • #25
                      Next step is to machine the bottom of the lug to cut it back to the same as the rocker box surface. Used the piece of paper to gauge the tool to the rockerbox, then set the digital read out to zero. Now back it away and take the first tentative cut.

                      Steve Little
                      Upper Yarra Valley. Victoria.
                      Australia.
                      AMCA member 1950

                      Comment


                      • #26


                        Nearly caused more work for myself.
                        I cut it back nicely and adjusted the table to do the final cut when the phone rang. As I turned from the mill to go and answer the phone, I banged my knee on and the machine. Didnt hurt much, didnt pay too much attention to it. Came back, turned the machine on and started to make the final cut. You might be able to see a small undercut at the start of cut. The bang on my knee was the crank handle for adjusting the height of the table. I had moved the table .003. Lucky I noticed before cutting too far. It annoys me but not worth welding and re-setup. Yep!! I'll wear it. I'm a Rookie machinist!
                        Steve Little
                        Upper Yarra Valley. Victoria.
                        Australia.
                        AMCA member 1950

                        Comment


                        • #27
                          I always love to see what you're up too Steve. It's always educational to see how other people make fixtures, or handle difficult challenges. You are a craftsman Steve.
                          Eric Smith
                          AMCA #886

                          Comment


                          • #28
                            Thanks Eric. Appreciate the compliment. What's happnin in Eric's garage?
                            Steve Little
                            Upper Yarra Valley. Victoria.
                            Australia.
                            AMCA member 1950

                            Comment


                            • #29
                              Steve,

                              First let me say that you did a great job on these two repairs. I am/was a formally trained machinist, graduating from an apprentice program and did development work on Navy nukes as a journeyman. I moved on to become an engineer, but still do machine work in my basement and out in my garage. I like you am a burden on society now. For somebody that learned how to do machine work by getting yelled at, you certainly were a astute student. I only wish I could MIG weld as good as you can. I know it take more practice than anything and I have to carry the blame for that.

                              I also agree that I'd love to see more stuff like this on this site. I come here on occasion to ask questions or maybe share something. But, unfortunately, I find that there is just not a lot of sharing and documenting of fixes, tricks, etc.. I'm a long time member of the Triumphrat Vintage forum and they have a section called tips and tricks. Plus, there are always several well documented and photographed restoration projects being logged by members.

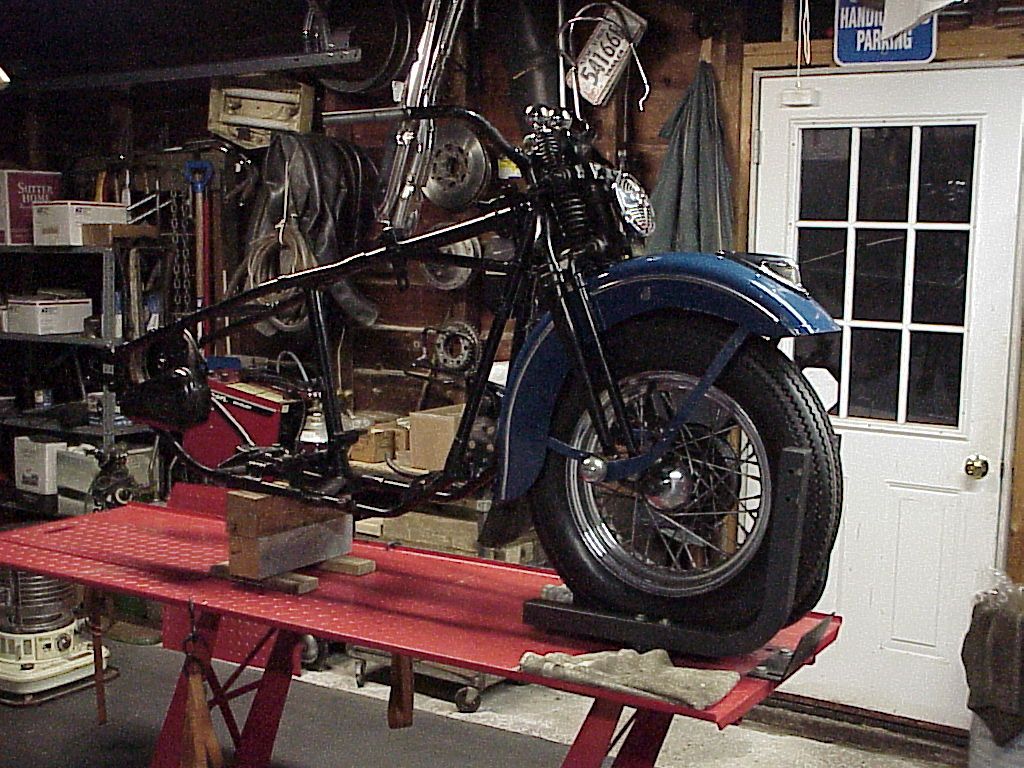
                              Which brings me to my next point. Posting photos. There is a much easier way to post photos from photobucket. And you don't need to be clicking any icons here. I'm going to post a photo with this message just to prove to myself that this site for whatever reason will not work in this fashion. I'm going to borrow Piston-Bully's nice work of posting screen shots to show you how to do this. Go to his post and find the screen shot of the Photobucket page. On the right he has DIRECT circled. Just below that are two other links, HTML and IMG. All you need to do is highlight the second one down from DIRECT, which is IMG and copy the link. Then, just past it into your message wherever you want it to show. So, I'm going to do this now with a photo of my bike. One way to do this is to left click on the link, which should highlight the entire link, then right click and select copy. To paste it in the post, when you get to where you want I to be, simply right click your mouse and then select paste. Or if you use hot keys, Ctrl/v.

                              Here is the current status of my '47 EL. It's a one-owner bike, original paint in Skyway Blue with 42K on the odo. The day I found this bike just happened to be my day. Took it apart 7 years ago and started the reassembly process in Dec.


                              Final point to help others with Photobucket. You can upload more than one pic at a time to PB. Just hold down the Ctrl (Control) key and highlight more photos. The more you select to upload, the longer it takes. I find that with my internet connection, 6 is about the max unless I want to walk away and get a coffee.

                              Keep up the good work and congrats on your school of hard knock machining abilities. Bet you'll never bump into the table again with re-checking the set-up, willya? ;-)

                              regards,
                              Rob
                              Regards,
                              Rob Sigond
                              AMCA # 1811

                              Comment


                              • #30
                                Hi Rob.
                                Thanks for the encoragement.
                                I enjoy getting a bike up to the stage your at.
                                Bolting the front end on, and then stand back and admire.
                                It could be 11 pm at night, but when I see the front end all bolted up, I feel excited and could keep bolting parts on.
                                Wait a minute...Who am I kiddin, I don't make it to 11pm any more....but all that aside, I still get excited at the point in a build that your at.

                                In regard to the forum, I enjoy reading what other people are doing, as it engages me in something I relate to, instead of watching the rubbish on tv.
                                On occasion, I will walk in to talk to the wife and I will stand there and look at what's on the tv. There may be some good on there, but all I catch a glimpse of, is someone feeling embarrassed by a chef about how they cooked something, or the news showing some miserable kid who's had his niebourhood blown to bits.

                                I may be posting a few more machining pictures in the future.
                                I have been collecting parts for a XLR style Sportster to race in "Classic series" here in Australia. I've given up on finding an original engine ....(I thought 30,s Knuckle stuff was rare, but this stuff is extremely hard to find)... so I will be converting a set of 1960 xlch cases to xlr style ball bearing cams and flywheel. If anyone has any xlr parts or xlr or XLRTT heads, feel free to send me a personal message.

                                Stay tuned. Same Batty time. Same batty Chanel.
                                Steve Little
                                Upper Yarra Valley. Victoria.
                                Australia.
                                AMCA member 1950

                                Comment

                                Working...
                                X