Announcement

Collapse
No announcement yet.

Earlobe restoration

Collapse
X
 
  • Filter
  • Time
  • Show
Clear All
new posts

  • Earlobe restoration

    I was talking to a mate on the phone the other day and he said he is getting ready to build a another knuckle engine.
    He said he had bought some pieces on eBay that had some light wear and tear, and could I have a look at them and fix any anomalies.

    Bruce's rockerbox 002.JPGBruce's rockerbox 001.JPG

    Personally I think he’s annoyed that I’m retired and just buys this junk to keep me doing something.

    People have said that working on Harleys is like tractor technology.
    I think the previous owner may have heard that term to.

    When my grandmother had a mood going on, she would grab my ear lobe and rattle my eyeballs to make a point.
    The following message could have been delivered the same way to the previous owner, just before he messed it up....There is no place to work on a Harley with a 40oz hammer!!! ….using the earlobe, eyeball rattlin, method to best effect.
    Steve Little
    Upper Yarra Valley. Victoria.
    Australia.
    AMCA member 1950

  • #2
    Steve , i through all knuckle heads looked like that , its not for St-uts is it....Rob ps G,day

    Comment


    • #3
      G'day Rob. Nope, this isnt part of Shanes horde.

      Did some weld prep on the crack and popped it in the oven to pre heat 300F -150C before welding
      Bruce's rockerbox 003.JPGBruce's rockerbox 004.JPGBruce's rockerbox 005.JPG

      Welded the crack first and then pad welded the dented area.
      Steve Little
      Upper Yarra Valley. Victoria.
      Australia.
      AMCA member 1950

      Comment


      • #4
        Used the original machined surface that the rocker nut snugs up to and made a little machine stool so that I could pull it down tight to the table.
        I used a angle face plate to give extra support to the bottom machined surface, (where the rocker box mates to the head).
        Then did a few light cuts to bring back to the original height.
        Attached Files
        Steve Little
        Upper Yarra Valley. Victoria.
        Australia.
        AMCA member 1950

        Comment


        • #5
          The next step was to clean up the bore for the rocker arm seal.
          I should mention at this point, that I am not a machinist, and my only experience has been under the guidance of the 2 toolroom machinists who used to work for me when I had the frame business. Most of that tuition consisted of them yelling at me, (whimper, sniffle, sob) when I left the key in the lathe chuck,.

          I centred the machine over the bore by clocking onto the 3 original sides with a dial indicator.
          Taking 015” cuts, I bored it to within a few thou” of the finish cut.
          Using a red texta pen, I coloured a small section of the original surface and adjusted the tip of the cutter until it made light contact with the colour on the surface.
          Then said a quick prayer, flicked the switch and crossed my fingers just for extra insurance.
          Attached Files
          Steve Little
          Upper Yarra Valley. Victoria.
          Australia.
          AMCA member 1950

          Comment


          • #6
            Well, against all odds it came out very nice. The cutting tip didn’t take any of the original bore, but wiped the corrosion dust off the wall and cleaned up the welded side.

            I clocked onto the other bore and checked it for roundness, as it had a small hammer mark on the top side as well.
            I wanted to be sure that the seals were not distorted by the hammer dents.

            I have been told that the aftermarket rocker seals are a lot tighter on the shafts than original seals when new, and can hold a rocker so tight that it will hold a valve open.

            A dent into the bore would only make that situation worse.
            So in with the boring bar just to make sure.
            It only took a few thou off an area about /18” long, which was directly under the hammer mark and wiped the white mange corrosion out of the rest of the bore.
            At least I know it’s been checked.
            Attached Files
            Steve Little
            Upper Yarra Valley. Victoria.
            Australia.
            AMCA member 1950

            Comment


            • #7
              I tried using Photobucket to get away from thumb nail photos, but could not work out how to get them to the AMCA picture file.
              I clicked the (Internet source) in the AMCA box but got lost from there. Can anyone shed some tips on the easy way to do this?
              Steve Little
              Upper Yarra Valley. Victoria.
              Australia.
              AMCA member 1950

              Comment


              • #8
                I'd say Bruce owes you big time! Nice reclamation project.

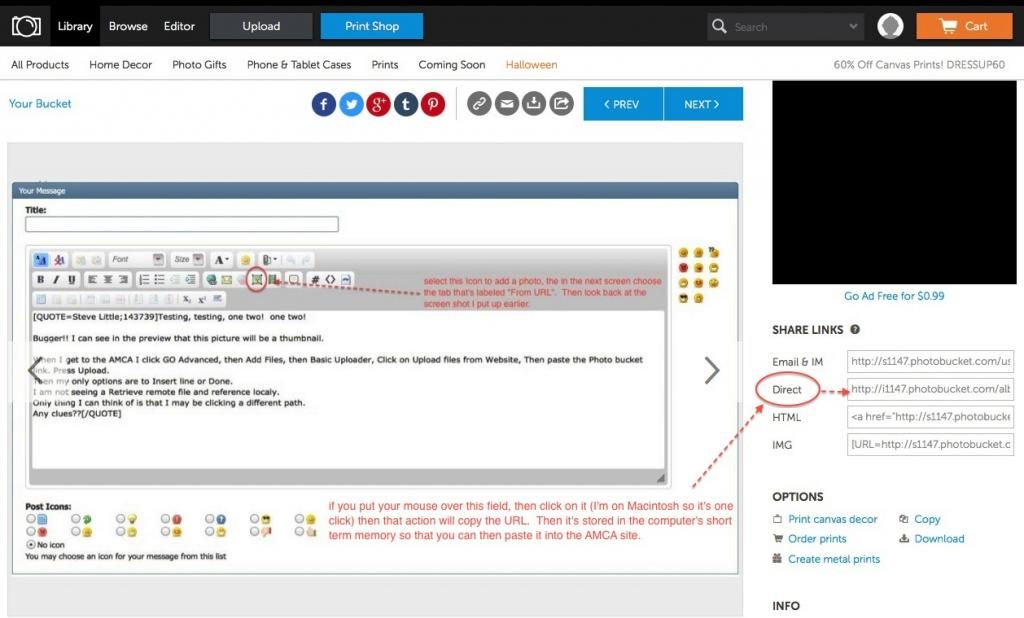
                When you put a photo in Photobucket you'll see a few options on the right of the screen with your photo. If you move your cursor to "Direct" it will copy the link for the photo. Then, on the AMCA posting page you select the little icon that looks like a painting, that will bring up a small window with two tabs on the top, choose the "From URL" tab, then paste the link from Photobucket into the blank field there. Also, uncheck the box below labeled "retrieve remote file and reference locally" and then your picture will show up in your posting. You pretty much have to have two browser windows active, one for AMCA and one for Photobucket so that you can switch between the two.
                Pisten Bully is Harry Roberts in Vermont.

                Comment


                • #9
                  Thanks Harry. You made it easy.

                  After a little die grinder work with a alloy dremel it came up pretty nice. He can hand polish it from here. The other rocker box just has the mounting lug broken of so it will be a bit boring to see that repair.

                  When I was unwell for long periods I would use the AMCA forum as my daily fix of entertainment...plus a few blogs.
                  Most days it was a bit disapointing. As we all know, nothing much happenes on here. But that could change if a few more people took the effort.
                  I dont watch much telly and much prefere to see pictures of someone doing something in thier workshop or shed.
                  Watching the eveil twin cannonball bike was fun and even though he didnt get it done in time for the race, I would like to thank him for the entertainment and effort of taking the pictures. Even watching him reroof his house was good.
                  Attached Files
                  Steve Little
                  Upper Yarra Valley. Victoria.
                  Australia.
                  AMCA member 1950

                  Comment


                  • #10
                    Nice work Steve thanx for posting-hope you stay well

                    Comment


                    • #11
                      Steve, just a little visual aid here!

                      Pisten Bully is Harry Roberts in Vermont.

                      Comment


                      • #12
                        Thanks Duffy. I have to admit that I enjoy bringing a part back into service with minimum impact on the original look.

                        Thanks for the visual Harry. Dont know how you did it, but I'm impressed. I will keep trying to master the upload, as the thumbnails are a bit restrictive when viewing a picture.
                        Ive taken pictures of the other rocker box fix. Maybe I'll experiment with them.
                        Attached Files
                        Steve Little
                        Upper Yarra Valley. Victoria.
                        Australia.
                        AMCA member 1950

                        Comment


                        • #13
                          Testing, testing, one two! one two!

                          Bugger!! I can see in the preview that this picture will be a thumbnail.

                          When I get to the AMCA I click GO Advanced, then Add Files, then Basic Uploader, Click on Upload files from Website, Then paste the Photo bucket link. Press Upload.
                          Then my only options are to Insert line or Done.
                          I am not seeing a Retrieve remote file and reference localy.
                          Only thing I can think of is that I may be clicking a different path.
                          Any clues??
                          Attached Files
                          Steve Little
                          Upper Yarra Valley. Victoria.
                          Australia.
                          AMCA member 1950

                          Comment


                          • #14
                            Originally posted by Steve Little View Post
                            Any clues??
                            Steve, this is sort of a selfish pursuit of mine since I prefer to see the photos in the posting and not have to log into the AMCA site... so here's a couple more visual aids! (full disclosure... I'm on this dang computer most of the day, and I've got customers in 7 time zones...)

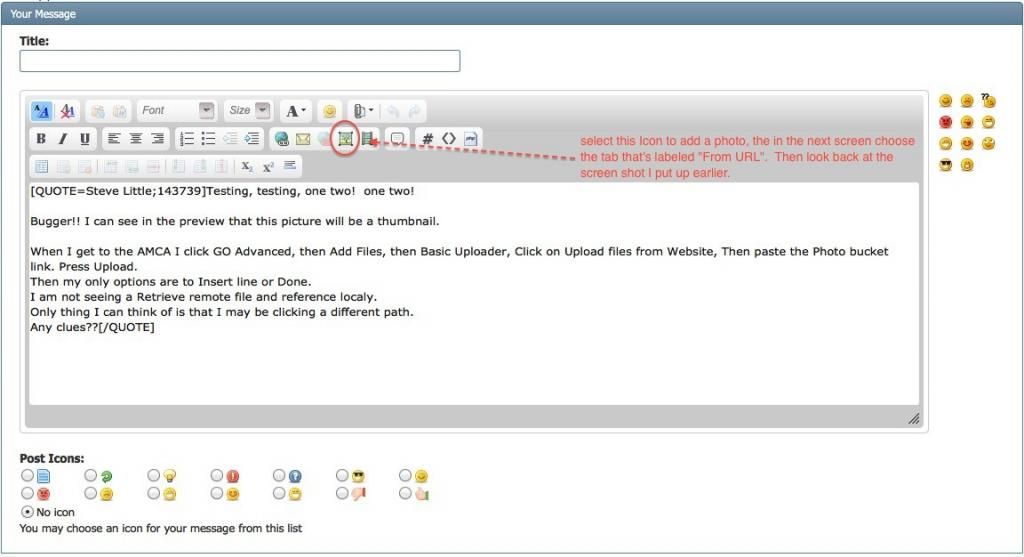
                            First step is to select the correct icon to add a photo to your posting:


                            Here's where it takes you:


                            You get there, and then you go back to the Photobucket page and select the "Direct" link so that you can go back to the AMCA page and paste it into the line there. AND... don't forget to uncheck the box saying "retrieve remote files...etc."

                            Last edited by pisten-bully; 10-16-2014, 08:44 PM.
                            Pisten Bully is Harry Roberts in Vermont.

                            Comment


                            • #15
                              And... you pretty much have to have your browser open on two pages, or tabs, so that you can go back and forth between the two:

                              Pisten Bully is Harry Roberts in Vermont.

                              Comment

                              Working...
                              X