Originally posted by VPH-D
View Post
Announcement
Collapse
No announcement yet.
Magneto Timing Position
Collapse
X
-
Murph,
Thanks for the dealer decal photo. I was able to make out the Ashland Ave street name, and wondered if it could have been in Chicago. I grew up in the Chicago area, but don't remember South Side. Maybe before my time, or I have just forgotten them. Thanks, Again.
VPH-D
Comment
-
Here is the culmination of what I have learned:
1. As someone suggested above, I measured the two mounting plates. As he suggested, I found that there is a difference of approximately 0.060" in the mounting plate thickness between the fixed base plate and the advancing magneto plate. The advanced plate is thicker, which mounts the magneto higher above the cam cover boss. With all other variables held constant, installing the mageto onto the fixed plate allows the point cam to rotate a little further clockwise, thus allowing the magneto to be swung a little less counterclockwise at the timing location. This affords proper air cleaner clearance while using the (correct) three caburator insulators. When properly timed, there is a gap of about 1/4" between the magneto cap and the air cleaner backing plate. Very Nice !!
2. Using the advancing mounting plate, I needed four insulators and the mag cap still hit the backing place with an interfeerance of about 1/8". Also, retarding the gear 1 tooth allowed of no timing retard after the linkage arm and mounting bolts were installed, thus negating the purpose of the advance setup.
3. There are different gear tooth-to-pin hole locations on the drive gears. However, these differences have very little affect on where the point cam lays out when the mag is installed. This defies logic, but its what I observed.
4. Given the above, it appears that the height above the cam cover has the most affect upon how far the magneto must swing out (counterclockwise) in order to open the points at the 45-degree BTDC firing position. I also suspect that there may be very slight diffrences in the circular attitude (starting point) of the differential cam gear spiral (that drives the magneto gear) as well, which would accommodate the timed magneto position for the later advanced setup. But rather than observation, this is purely supposition on my part.
In any event, The Harley Gods forced me to install the correct setup on my '64 and now I must find the correct fixed-grip left handlebar. My right knee be-damned!!
Looks like I'll take the advice of another member on this forum - hold the kill button until the very bottom of the kick-stroke. Why did I never think of that??!!??
Thanks again to you all for your valuable input.Last edited by billpedalino; 10-14-2012, 02:34 PM.Bill Pedalino
Huntington, New York
AMCA 6755
Comment
-
Hey Murph,
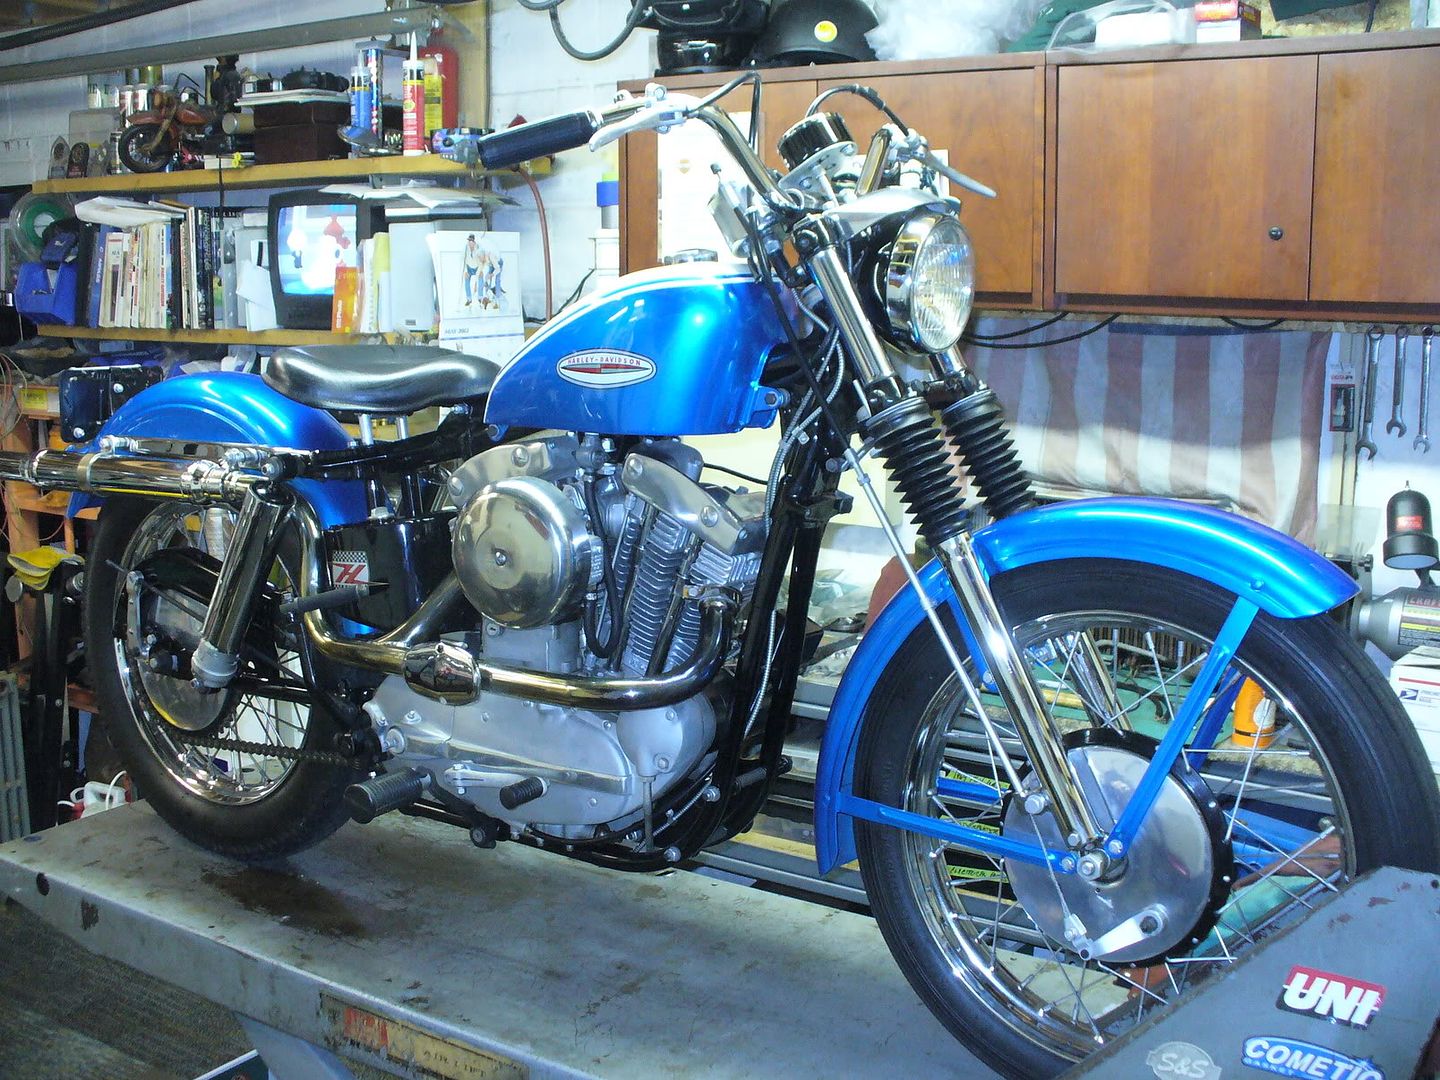
Do you have any pictures of the left side of your Blue '62 showing the correct wire loom runs - especially up the left frame tube, behind the rear cylinder, and around the stop light switch .
By the way, I printed oput your previous pics on this thread on large-format, glossy paper to use as reference. Thanks so much for sharing them. My memory from over 40 years ago (pre chopper days) is sometimes a bit foggy, even thoug I worked at a Harley dealership back then! One look at your pics generates an 'Ahh Yes' moment every time!
Thanks,
BillBill Pedalino
Huntington, New York
AMCA 6755
Comment
-
Thanks so much Murph. Great pictures and very interesting.
Your wiring layout in the above pic shows all. So if I understand you, the tail and stop light wire harness meet the harness from the regulator at a point below the front-left edge of the rear fender (near the left side swing arm pivot) where the stoplight switch ties in ?Bill Pedalino
Huntington, New York
AMCA 6755
Comment
-
Yes, I have the wiring diagram. But they often don;t tell you where the loom legs run. I had to look at a lot of bikes to determine the correct runs for my 47 FL. My 53 FL is very similar to the knuckle. But the Sportster is easy after looking at your pictures and jogging the cobwebs off of my brain..
By the way, that fuse block on the regulator mount is a very nice piece - I believe they only made it for 4 years. I'll bet that was hard to find!Bill Pedalino
Huntington, New York
AMCA 6755
Comment
-
I will send you what ever pics you need so take your time, and if in doubt don't do anything until you ask. I have lots of pics or can take some of a specific area if needed. I have found it better to make up your own harness rather then buy the pre packaged ones. they are not right.1959 XLCH
Comment
-
Murph,
You're correct about the pre-assembled harnesses. I bought one for each bike I have along with bulk amounts of each cloth wire color and each loom cover size. on my big twins I used the harness kits as a starting point and modifed them as becessary.
My business is, and has been terrible for the last three years, so disposable (ie; motorcycle) money is very tight right now. Therefore, the it will probably be another year or so before I'm ready to assemble the big pieces and and wire it up. I completed the motor a while ago, with the magento being the last piece to 'get right'. I did spend a few dollars to re-magnetize the rotor and also ran the magneto up at Morris Magnetos in New Jersey to insure that the spark is as strong as it can be. Once the primary cover is re-chromed, the motor can be buttoned up, shrink-wrapped and placed on the shelf.
In the meantime I'm doing all of the detailed stuff that takes more time and parience than money. Two things that I don't do myself are paint and chrome and both are expensive, So those tasks will have to wait. But its a labor of love, so I really don't mind the wait. There's a lot of stuff to detail out on the other bikes.Bill Pedalino
Huntington, New York
AMCA 6755
Comment
-
Originally posted by Bill Pedalino View PostMurph,
You're correct about the pre-assembled harnesses. I bought one for each bike I have along with bulk amounts of each cloth wire color and each loom cover size. on my big twins I used the harness kits as a starting point and modifed them as becessary.
My business is, and has been terrible for the last three years, so disposable (ie; motorcycle) money is very tight right now. Therefore, the it will probably be another year or so before I'm ready to assemble the big pieces and and wire it up. I completed the motor a while ago, with the magento being the last piece to 'get right'. I did spend a few dollars to re-magnetize the rotor and also ran the magneto up at Morris Magnetos in New Jersey to insure that the spark is as strong as it can be. Once the primary cover is re-chromed, the motor can be buttoned up, shrink-wrapped and placed on the shelf.
In the meantime I'm doing all of the detailed stuff that takes more time and parience than money. Two things that I don't do myself are paint and chrome and both are expensive, So those tasks will have to wait. But its a labor of love, so I really don't mind the wait. There's a lot of stuff to detail out on the other bikes.
1959 XLCH
Comment
-
Howdy, long time AMCA member, first timer to the Forum.... Enjoyed reading all your XLCH correspondence, as I try and get my recent acquisition, a 1967 XLCH up and running.
It belonged to my good friend David Hense of Mke, who passed. He never quite finished it, and I have enjoyed getting her roadworthy and up and running. I have a number of mainly unrestored Hydra-Glides, Knucklehead, U and W model Harleys in my collection and am conversant with their servicing and repair. The " modern" 1967 CH, I have to admit, has me nearly beat....... I can not get it to start easily, and when started, it runs real RICH, then pops through the Tillotson and stops. I have done the following:
1) serviced the Tillotson carb, in fact put another one on to check. NO difference
2) Pulled the cam gears out to check correct timing, all AOK
3) Took heads off and checked for cracks, all OK, reground the valves and resealed manifold with new O rings, NO difference.
4) Had the magneto re magnetized, and replaced the condensor, NO difference.
5) Set the mag points to .015", and put new HD 3-4 spark plugs in, No difference
6) Timing front cylinder on comp stroke to the single line timing mark as per my factory manual - NO difference.
This has me beat, I am missing something!!
Would any of you gentlemen know what the SECOND set of double strip timing marks are for on the flywheel?? A few degrees AFTER the single timing mark - Should I be timing to these marks?? I have tried it, but seems retarded.
The only other thing I can think of is that my buddy Dave, may have used the wrong cam gears, or they are not matched.
I did not measure them when I had them out, and assumed they were OK. From memory, they had marks on the inside of the lobes.
Are there any details on what 1967 cams should measure??
I was hoping someone might be able to assist my challenge.....
All the best and thank you,
Tony Blain
Sydney, AUSTRALIA
4)
Comment
Comment