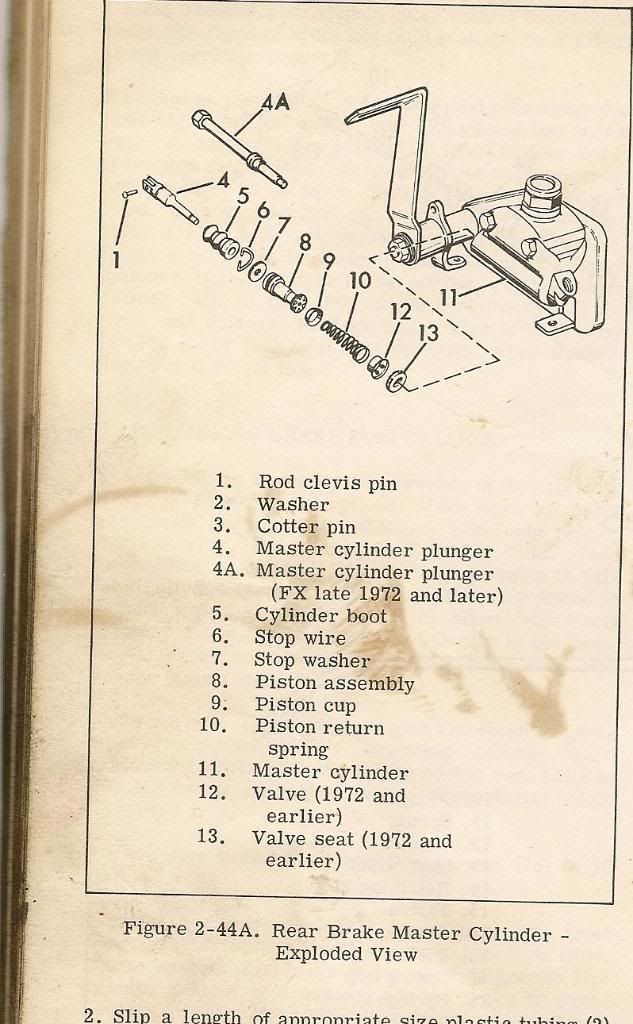
OK, cause brakes are an important item and there seems to be some confusion, here is the diagram from my service manual.

Item # 13 is the rubber washer, it is the valve seat. Item # 12 is the metal part, it is the actual valve. For clarity here is a photo of the actual parts laid out in the correct order of assembly FOR DRUM BRAKE APPLICATIONS ONLY.

The top row of parts shows all the parts individually as they come in the kit, in the correct order ( for drum brakes only!). The spring at the top is shown with a residual valve installed in it in the correct fashion, it is separated on the bottom for clarity. I did not install the O-ring on the piston since I only got this stuff out for illustration, I only put the O-ring on during assembly, using brake fluid as lube. Note I have two different types of springs. The one on top is from a rebuild kit from the auto parts store, the lower is from an H-D master cylinder. The difference being the little cap on top of the spring on the replacement. I do not know what if any benefit the cap provides but there is no need to remove it. After rebuild, and after system has been bled, you should make sure that the system is functioning correctly by observing a small fluid bubble is released in the bottom front of the master cylinder reservoir when the pedal is released after firm application of the brake. Complete master cylinders manufactured 1973 and later are marked for application, those without the valve installed are marked with a paint dot and are for disc applications.They can be converted as long as you have a valve and seat to install. Brake failure is not an option around here. If there is ever even the slightest doubt in your mind as to exactly how a master cylinder is set up, disassemble it and verify it is correct for your application. Hope this helps everybody out.

Item # 13 is the rubber washer, it is the valve seat. Item # 12 is the metal part, it is the actual valve. For clarity here is a photo of the actual parts laid out in the correct order of assembly FOR DRUM BRAKE APPLICATIONS ONLY.

The top row of parts shows all the parts individually as they come in the kit, in the correct order ( for drum brakes only!). The spring at the top is shown with a residual valve installed in it in the correct fashion, it is separated on the bottom for clarity. I did not install the O-ring on the piston since I only got this stuff out for illustration, I only put the O-ring on during assembly, using brake fluid as lube. Note I have two different types of springs. The one on top is from a rebuild kit from the auto parts store, the lower is from an H-D master cylinder. The difference being the little cap on top of the spring on the replacement. I do not know what if any benefit the cap provides but there is no need to remove it. After rebuild, and after system has been bled, you should make sure that the system is functioning correctly by observing a small fluid bubble is released in the bottom front of the master cylinder reservoir when the pedal is released after firm application of the brake. Complete master cylinders manufactured 1973 and later are marked for application, those without the valve installed are marked with a paint dot and are for disc applications.They can be converted as long as you have a valve and seat to install. Brake failure is not an option around here. If there is ever even the slightest doubt in your mind as to exactly how a master cylinder is set up, disassemble it and verify it is correct for your application. Hope this helps everybody out.
Comment