Announcement

Collapse
No announcement yet.

Wiring "junctions"

Collapse
X
 
  • Filter
  • Time
  • Show
Clear All
new posts

  • Wiring "junctions"

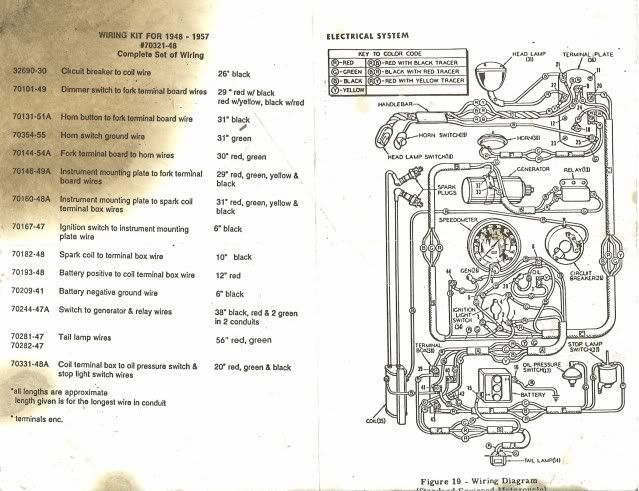
    I didn't take very good pictures (in some cases) when I tore apart the '66, and all of the wiring was not stock...but. Have strung my new harness, made all of my terminal connections and there are two wiring Junctions on the dash plate according to the wiring diagram.

    I have the old insulators and stuff, but I think I assumed they were ground connections at the time I took it all apart. Now, of course, I realize that they are hot connections. There was simply a bolt through a hole (probably a 10-32 bolt and a size 12 hole...) not much bigger than the bolt.. I have the insulating washers, but did they really just "center" the bolt so it did not touch the sides (not much clearance) and tighten 'r down? or was there some sort of insulating grommet. There are two of these junctions on the dash plate. On either side of the ignition switch...between it and the speedo.

    Anyone have the secret? Am I missing parts or were there other mounting points? or did they really just center the bolt in the hole, tighten it down and hope it never shorted out?

    Thanks,
    Steve

  • #2
    Harley used a variety of insulators over the years. Most of the dash terminals used the spacers and a couple of fiber washers with a dimple in the middle to keep them centered along with a couple metal washers to keep it all intact. The frame and horn bracket terminals on earlier models used phenolic washers and spacers. The fiber washers are just like little cardboard discs so easy to lose or forget. Do not try to make it work without them unless you are fond of fireworks and bad smells! Look in your parts book to see the set-up.
    Robbie
    Robbie Knight Amca #2736

    Comment


    • #3
      i saw the dimpled ones in the main terminal board..but not in the dash plate! that helps, thanks!

      Comment


      • #4
        The stock two and three light dash terminal assembly is: 8-32 slotted indented hex head screw, lockwasher, wire terminal(s), flat washer, bakelite washer, dimpled paper washer, dash base proper, dimpled paper washer, bakelite washer, flatwasher, nut, wire terminal(s), lockwasher, nut. The common hot screw is longer than the others. This isn't shown in the parts book (in fact the screw listed in the parts book is plain wrong). The exception to the above assembly is the horn terminal from 54->64. It dispensed with the dimpled paper washers and used a thin phenolic washer to centre the screw since the hole used is much larger than the other terminals'. This isn't shown in the parts book either. If you want photos of a dash terminal assembly let me know ... Perry (dash bases r us)

        Comment


        • #5
          you know the more I read the more confused I get. restoring my 50 pan and know while trying to wire it up it is going to be more difficult than I thought
          Moose
          aka Glenn

          Comment


          • #6
            Originally posted by Glenn View Post
            you know the more I read the more confused I get. restoring my 50 pan and know while trying to wire it up it is going to be more difficult than I thought
            Not difficult at all. Simply buy a reproduction wiring kit and install it.
            Be sure to visit;
            http://www.vintageamericanmotorcycles.com/main.php
            Be sure to register at the site so you can see large images.
            Also be sure to visit http://www.caimag.com/forum/

            Comment


            • #7
              I did buy a repro kit and just want to make sure of the routing and the correct holders etc. My bike was apart once before I bought It so I'm not sure of the correct routing. I do have that schematic thanks
              Moose
              aka Glenn

              Comment


              • #8
                Here's a close up of a terminal assembly off and on a dash and photos of a 66 dash base ... Perry
                Attached Files
                Last edited by Perry Ruiter; 07-26-2009, 01:10 PM.

                Comment


                • #9
                  good looking job perry---looks like you didn't re-plate the base. i usually spray it with clear lacquer after it is all assembled to stop it from rusting again if i don't re-plate it. keeps it looking good longer.

                  Comment


                  • #10
                    Originally posted by flat-happy View Post
                    good looking job perry---looks like you didn't re-plate the base. i usually spray it with clear lacquer after it is all assembled to stop it from rusting again if i don't re-plate it. keeps it looking good longer.
                    I didn't restore that base. That's an all original one. I have several nice original ones from various years on the shelf to use as references. It's no problem to still get cad plating done here and that's what I do to the bases I restore ... Perry

                    Comment

                    Working...
                    X